A baby wagon stroller is an amazing choice as it takes 10 to 15 minutes to attach to the Graco Convertible car seat.
This article is for a Graco-compatible kid’s stroller with a Graco car seat. I find the attachment hacks effective from my experience while using Graco Ready2Grow, Graco Click Connect, and LX Stand & Ride Stroller.
Overall, I tried to write an in-depth attachment instruction that fits almost all Graco Strollers compatible with Graco Car seat.
If anything I missed then feel free to ask me in the comment box.
Let’s begin!
HOW TO ATTACH CAR SEAT TO STROLLER GRACO
Make sure first, that you have both the Graco infant car seat and the compatible Graco stroller with the Classic Connect System.
Now, let’s jump into the process below
STEP 1: REMOVE THE CANOPY
Before starting, remove the canopy on both side of your stroller for easier access.

Default removal Process of Canopy:
Click connect system stroller involves pulling it up to detach first then lowering the stroller seat for access. Now, you can find all attachment points behind mesh panels, sliding the canopy into place. Once you find it across the frame then gently press on both sides. While pressing, you will be hearing a sweet-clicking sound.
For the Graco 2.0 Double Stroller, squeeze the hook & loop strap so that the canopy will release for the second seat or both. Afterwards, fold the canopy, and store it also, you can wash the fabric.
Some Graco Strollers won’t come with the Frame attachment where canopy fits across it
For the Graco urban travel system folded stroller is one of them, so all you have to do is unsnap the button (from handlebar) and then push on the inside canopy. Afterwards, the entire canopy will be removed
STEP 2: RECLINE THE STROLLER FRAME
Stroller frame is another great accessories as it support the car seat while adjusting to the click connect system stroller.

Let’s walk you through how to recline it below:
To adjust the recline of the Graco stroller, begin by pressing the buttons located on both sides of the seat.
Pull the seat back to recline it to the desired position, ensuring it locks securely into place.
Next, locate the Click connect mounts on the stroller and insert the toddler seat onto the stroller frame.
Securely attach the toddler seat to the stroller. Finally, make sure the stroller frame is firmly locked in place for great support and safety during use.
STEP 3: REMOVE THE SEAT PAD
While adjusting the car seat, you need to remove the stroller seat pad first.

To remove the cushion and fold the flap off the seat, remove the Velcro and fold the padding into the crease.
If the velcro system is not found on your Graco mode stroller then try these steps:
- Undo the hook and loop tape on the sides of the stroller.
- Unsnap the two snaps below the parents tray to remove the canopy.
STEP 4: STROLLER TRAY SETUP
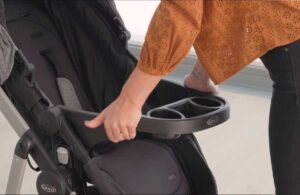
Open up the stroller and locate the snack tray where the infant car seat will be attached. For the Graco click connect stroller, the tray is typically located near the handlebar of the stroller.

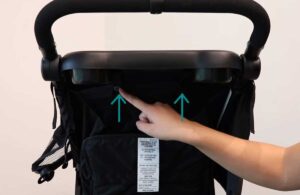
Pull-Down Elastic: The Stroller baby’s tray typically features an elastic strap that helps to secure it in place. To begin, locate the elastic strap on the underside of the tray.
Locate Tabs: On each side of the snack tray, there are tabs that the elastic strap attaches to. These tabs are usually positioned near the connection points where it meets the stroller frame.
Pull Up on Tabs: Gently pull up on each tab to release them from their secured position. This action allows the elastic strap to lose the stroller so thus, it provides flexibility
Raise upward: With the tabs released, you can now lift it on both sides. Raise it upward until it reaches a comfortable height for your kid.
Secure Tabs: Once the tray is adjusted to the desired position & height, rejoin the tabs to their respective connection points on the frame. Ensure that the tabs are securely fastened to prevent them from moving or becoming dislodged during use.
Check Stability: After adjusting and securing the child’s tray, give it a gentle shake or tug to ensure that it is stable and properly attached. The tray should remain firmly in place without any wobbling or shifting.
STEP 5: ATTACH GRACO CLICK CONNECT STROLLER WITH THE INFANT CAR SEAT ADAPTER
Car seat adapter is your go to accessories for forward or rear facing car seat.
Place the Adapter Over the Wagon: Position the car seat adapter over the wagon with the curved bar facing the back of the toddler seat. Ensure that the adapter is centered and aligned properly on the wagon.
Click Into Place: Once the adapter is positioned correctly, click it into place on the wagon. You should hear or feel a satisfying click, indicating that the adapter is securely attached.
Check Arrows: After clicking the adapter into place, verify that the arrows on the adapter are visible. This indicates that the adapter is properly aligned and locked onto the wagon.
Click Infant Car Seat Into Place: With the adapter securely attached to the wagon, it’s time to click the infant car seat into place.
Ensure Proper Alignment: Align the car seat with the adapter, ensuring it is facing the right direction. The car seat should sit evenly and securely with no wobbling or shifting.
STEP 6: ADJUST THE HARNESS GRACO INFANT CAR SEAT
There are two types of harness positions that come the with Graco Car seat.
The forward-facing is located above the kid’s shoulder & the rear-facing is just below the baby’s shoulders.
Position Your Child:
Place your child in the car seat with their back flat against the back of the seat.
Adjust Harness Slots:
Determine which pair of harness slots are even with or just below your child’s shoulders.
If adjustment is needed, remove your child from the car seat and move the harness straps or latch to the proper slots.
From behind the seat, unlock the ends of the two shoulder latches from the metal splitter plate.
From the front, pull the latch through the harness slots and then install them through the appropriate slots. Make sure that the both straps/latches are through the same set of slots.
Reassemble the strap ends onto the metal splitter plate.
Check the Harness Position & Adjust it:
Ensure that the loops of the straps are completely within the splitter plate slots and that the straps are not twisted in the back or front.
Here are the steps to manually adjust the height of the harness straps:
- Lift the lever in one hand and pull the shoulder straps in nother to loosen the harness straps.
- Remove both shoulder harness strap loops from the splitter plate on the back of the child restraint.
- Pull the harness straps through the restraint and pad of the car seat.
- Insert the harness straps into the desired slots. Ensure that the harness straps are threaded through the matching slot of the seat pad and the child restraint.
- Insert the harness straps behind the harness cover plate.
- Attach the harness straps to the splitter plate on the back of the baby restraint.
WHICH SET OF LOOPS SHOULD I USE
Graco SnugRide Classic connect 30 and 35, offer an extra way to adjust the harness at the hips. These models have loops at the end of the straps that fit over the baby’s hips.
Locate the loops at the end of the harness straps that are designed to go over the baby’s hips.
Upper Loops:
These loops are utilized with the lower two harness slots on the Graco car seat. They are intended to secure the harness safety strap for optimal fit and safety.
End Loops:
The end loops are designated for use with the upper two harness slots on Graco car seats. They help to secure the harness straps in the desired position and security for your child.
Each side of the harness should be placed on the same hip loop.
Choose the hip loop setting that provides a snug fit for your baby. Ensure that the harness is secure and comfortable for your child.
graco two belt pathway stroller attachment, you can easily connect Graco car seat without a base.
FINAL STEPS: READY TO RIDE
Once you have confirmed that everything is securely in place, your baby is ready to ride in the stroller. Push the stroller with confidence, knowing that your little one is safely secured in the Graco infant car seat attached to the stroller using the Classic connect System.
TYPES OF SAFETY FEATURES & HARNESS OF GRACO CAR SEAT
Different models of Graco car seats come with different types of harnesses and straps. Let’s walk you through those features below
Velcro Straps: Graco Convertible car seat comes with Velcro straps and it seems the best feature to secure the attachment. To attach the velcro straps you will find hooks alongside the frame. Sounds like it is the easiest way to secure the attachment
Chest clip: It is correctly adjusted on the harness straps. It should be positioned at armpit level and snug enough to allow only one finger to fit between the clip and your child’s chest.
Harness Straps: These adjustable straps secure your child in the car seat. Graco car seats typically feature a five-point harness system consisting of two shoulder straps, two hip straps, and a crotch strap. The harness straps are adjustable to accommodate your child’s size as they grow.
Harness Adjuster: The harness adjuster allows you to tighten or loosen the harness straps to ensure a snug and secure fit around your child. Graco car seats often have a convenient one-pull harness adjustment feature for quick and easy tightening.
Harness Buckle: This is the mechanism that secures the harness straps in place once they are fastened around your child. Graco car seats have a sturdy harness buckle that clicks into place securely to prevent accidental unbuckling.
Harness Covers: These are padded covers that go over the harness straps to provide additional comfort for your child. Graco car seats often come with removable harness covers that can be easily washed for convenience.
Tether Strap: Some Graco car seats are equipped with a tether strap, which is a safety feature that attaches the car seat to an anchor point in your vehicle. The tether strap helps prevent forward movement of the car seat in the event of a crash, enhancing your child’s protection.
FINAL WORDS
Connecting the Graco car seat with a stroller depends on the Graco modes or features available for them. Here I tried to show all the possible ways to adjust car seat with graco.
Last but not the least, safety first!
So, make sure, you will go through the steps by following all safety recommendations I’ve mentioned.


