Car accidents are the #1 killer of children ages 1-14.
Yet 3 out of 4 people use their car seats incorrectly, even though using a child restraint properly can reduce the risk of death by up to 71% in a crash.
That’s why we got together with Child Passenger Safety Technician Kristen Gardiner, to provide you with the definitive guide for car seat safety.
Please read the guide and share it with other parents you know.
You may save a child’s life.
Table of Contents

Chapter One: The Importance of Car Seat Safety
Did you know that car crashes are the #1 killer of children ages 1-14?
This is why nothing is more important than proper car seat safety.
The startling truth is that 33% of American children (ages 12 and younger) who died in 2011 were not restrained.
This doesn’t include the nearly 150,000 children who were injured—some very seriously—in crashes.


From Visually.
If you’re thinking, I properly restrain my child, know this:
Between 72 and 84 percent of child restraints have shown critical misuses.
These basic misuses significantly increase your child’s risk of bodily injury during a motor vehicle accident.
In this case, what you don’t know, could potentially harm your child.
The bottom line: It’s been stated that up to 96 percent of parents believe they use their child’s car seat safely — when related injury stats show otherwise.
In this case, what you don’t know, could potentially harm your child.

A lack of education and awareness could result in the unthinkable. That’s why you need to know for sure whether or not your child is sitting in the right car seat and whether that seat is being used properly.
It is time to get the facts straight.
These stats will make you rethink your child’s current car seat, as well as your approach to their ultimate safety. When you take a proactive approach, you could potentially save your child’s life:
- When using a car seat, you reduce the risk of an infant’s death by 71%
- When not misused, child restraints reduce the risk of death among children aged 2-6 by 28%, compared to seat belts
- Between 75% and 90% of car seats are not used properly — this is a MAJOR issue
- Most parents do not understand the impact a collision can have on a child’s neck, significantly increasing the risk of fatality.
The good news?
Although preventable injuries and deaths still occur, as seat belt safety has improved, the number of children who are killed or injured has decreased since the 1970s — but there’s still far too many parents that do not understand the importance of car seat safety.

Just remember, when you take the right steps, you can significantly reduce your child’s risk of injury.
It’s important for moms and dads to discuss this issue and bring light to the subject — as it could save a life.
Take, for example, Rachel McNamara, a mom whose picture went viral after showing the importance of proper car safety
(side note: don’t actually do this with your child at home and risk dropping them!).
After strapping your child into their car seat, ask yourself if you’d be comfortable flipping it upside down. Remember… Posted by Rachel McNamara on Friday, March 17, 2017
Further Reading:
- Motor Vehicle Safety Fact Sheet 2016 (PDF)
- Child Passenger Safety: Get the Facts
- Car Seat Facts and Stats: A Crucial Part of Car Safety
Chapter Two: How Car Seats Work
Most of us know that a car seat’s ultimate purpose is to protect a child from injury or death during a potential collision.
But exactly how do they provide that protection?

Knowing some of the facts about what happens in a crash will help you understand:
- why car seats are designed in a certain way
- what kind of car seat is best for your child
- how to install and use your seat properly
- why it is critical to install and use it properly
However, if you find this chapter too technical, feel free to skip to the next chapter and find out whether you are using the correct car seat.
While riding in a car, our bodies travel at the same speed as the car. The vehicle and our bodies will continue to travel at that same speed until some type of force is applied to stop us.
In a crash, the vehicle is stopped abruptly by an external force such as another vehicle or object on the road. Those riding in the car will continue traveling at the original speed until something stops them. That something will apply a force on their body.
The amount of force it will take to stop a person in the car can be approximated by multiplying their weight by the speed they are going.
For example, a 20-pound child traveling 30 miles per hour can have up to 600 pounds of force applied to their body to stop them.
600 pounds of force can cause serious damage, and that’s why we need safety mechanisms.
The goal of the car seat is to reduce the force on your child and spread it out across the strongest parts of their body.
The goal of car seats, seat belts, and other safety features in vehicles is to:
- reduce this force by extending the amount of time it takes for our body to come to a complete stop and
- to spread out the remaining force across the strongest parts of the body.
That’s why you must always refer to your car seat’s manual and ensure that the seat is secure.
Don’t know how? Don’t worry — we will get into all of this, plus more, later in this guide.
To visualize the difference in how an unrestrained person and a properly restrained person experience the impact of a collision, consider the everyday activity of jumping on a trampoline or a rebounder.
When a person comes into contact with the surface of the trampoline, it stretches and slows their fall until they come to a temporary stop before bouncing back up. Car seats and seat belts are designed to move in a specific way similar to this stretching motion.
On the other hand, if a person jumping on the trampoline falls or jumps to the ground instead, their fall is stopped abruptly and increases the chance of injury. (That’s why we recommend you use the safest trampoline in your own home).
This type of impact is what we are trying to avoid.
Seat belts were designed to distribute and direct stopping forces to the strongest parts of our body (sternum, shoulder, pelvis). However, seat belts are designed for adults and children won’t experience the same benefits of a regular seat belt that adults will.

This is where car seats and belt-positioning-boosters come in.
Source: Wikipedia
A car seat works based on a combination of its basic parts. Each key feature plays a role, ensuring that children who are using a seat appropriate for their age, height, and weight are protected in case of a crash.
The reason why a car seat’s design is so important, is based on a child’s body.
Children are NOT small adults in terms of their developing bodies. A child’s
- Head
- Thorax
- and Pelvis
all develop with age, and based on the development of the child, this will change how their body interacts with a restraint system.
As we will discuss in the following chapters, in order for your child to be properly protected, your decisions of which car seat to use and where to position the car seat MUST be based on the child’s age and size, and proportions.
Most parents do not understand the impact a collision can have on a child’s neck, significantly increasing the risk of fatality.

Source: Mommy Adventures
One of the most important factors when protecting a child, is their head — as a child’s head exhibits a heavier center of gravity. At the age of 3, for instance, a child’s head is generally around 80 percent of the adult mass — meaning, in comparison to a child’s body, their head is proportionately larger.

Source: study
Depending on your child’s stage of development, they will require a unique variation of child restraint systems (car seats and boosters) due to the way in which their body would hypothetically move if an accident occurred.
The safest car seat for a 17 lb 6 month old baby will not be the safest car seat for a 30 lb 2.5 year old child. Having the right car seat for the right child is key in keeping them protected in the car. The safest car seat for a 17 lb 6 month old baby will not be the safest car seat for a 30 lb 2.5 year old child.
Having the right car seat for the right child is key in keeping them protected in the car.
With all of this in mind, let’s take a closer look at how car seats actually work in terms of your child’s head and body.
- Children’s bodies and skeletal system are not only more fragile, but also require unique features based on their size and development.
- Rear-facing car seats provide greater protection by spreading forces across the seat itself, reducing stress put on the harness and child, and better protect a baby’s neck, spine, and head. In the event of a crash, the associated force will be distributed across their entire body. Rear Facing is the safest option when your child meets the proper requirements. Once they’re too heavy or tall for a rear-facing seat, then another seat will need to be purchased to provide the proper level of protection.
- When your child has outgrown the maximum height and weight limits on their rear-facing seat, a forward-facing seat is the next step, if they have adequately developed stronger back and neck muscles. When installing this type of car seat, the harness will be critical. If an accident occurs, your child will be secured by this harness — and based on the addition of a top tether, their head will also be protected from continuing to travel forward in the event of a crash.
- For children that are ready for a booster seat, this option elevates a child and positions the seat belt through guides so that a regular seat belt properly fits across the strongest areas of the skeleton — including the pelvis and ribcage. This means that if an impact occurs, the force will be spread across these areas, instead of more fragile sections of their body.
Scientific testing has been completed comparing these varying seats. In one key study, it was found that when a ‘child’ dummy was placed in a rear-facing seat, in comparison to a forward-facing seat, neck injury criteria was reduced.
So, when it comes to how car seats actually work — you need to ask yourself, which seat is appropriate for my child and vehicle?

Let’s dive into the types of car seats on the market and what they mean in terms of child safety.
Further Reading:
Chapter Three: Types of Car Seats
Deciding which type of car seat will be appropriate for your child and also meet other requirements you may have can seem daunting.
But it is critical to get this right.
This chapter will break down the different types of car seats, what features they provide, and which seat is the right one for your child.

Different types of car seats are tailored to each age and stage of your child.
The kind of seat your child needs will depend on:
- your child’s age,
- your child’s weight and height
- the size and type of your vehicle
- your ability to install it correctly every time
Here is an image from the CDC that sums up how to pick a car seat type by age.

Source: CDC
Here are the different types of car seats:
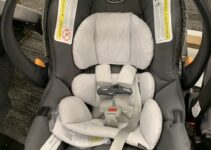
1. Infant Car Seat
This car seat can ONLY be installed rear-facing.
Infant car seats are appropriate for children who are:
- newborns through approximately one year of age
- with minimum weight of 4-6 pounds
- with maximum weight of 30-40 pounds (weight limits can vary significantly between manufacturers).
- with the top of their head being at least one inch below the top of the seat
Many parents choose to begin with an infant seat because it is more convenient:
An infant seat has a base that stays in the car, while the carrier can be snapped in and out of multiple vehicles with their own bases. Many times this seat comes with a stroller as part of a travel system..
This makes it easier to quickly carry the baby from place to place and keep them out of cold or hot weather.
However, an infant car seat lasts for just one year and it is recommended that children stay rear facing until age 2. This means that a convertible seat may also need to be purchased in order to remain rear facing to two years old.
When a child becomes too heavy — or too tall, it’s time to switch to a convertible car seat.
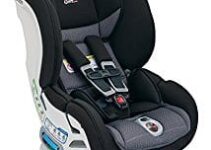
2. Convertible Seat
A convertible car seat can be installed rear-facing or forward-facing, but plan to rear-face your child as long as possible.
It can be used for newborns over 5lbs, or when an infant grows out of their infant seat.
Convertible car seats are appropriate for children who are:
- with maximum weight of 40 to 50 pounds in the rear-facing position.
- with maximum weight of up to 65 pounds or more in forward-facing.
Follow guidelines based on the seat and only switch to forward-facing when the child is ready (recommended age is 2+).
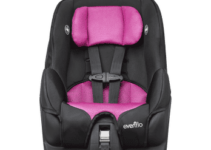
3. Combination Seats
This seat can be used as a harnessed forward facing seat or as a belt-positioning-booster seat.
Combination seats are appropriate for children who are:
- older than age 2
- weighing between 20 and 90 pounds for forward-facing with the 5-point harness.
- weighting between 30 to 120 pounds (although preferably at least 40 pounds and older than age 4) in booster mode without the harness
4. Booster Seat
When a child grows out of the harness of their forward-facing seat, a booster seat can be used by properly positioning a vehicle’s seat belt system.
High-back models are recommended for increased support of the head, neck, and torso and for additional side impact protection.
Booster seats are appropriate for children who are:
- at least 40 pounds
- age 4 or older, and
- are mature enough to sit still for the entire ride in the car.
If the child can’t sit properly the entire time, this seat can’t do its job.
Children as old as 9-11 will likely continue to require a booster seat until they are as tall as 4’9” and can fit properly into an adult seat belt (see “the 5 Step Test”).
Weight limits can vary greatly — know your region’s laws and always follow the manufacturer’s directions.
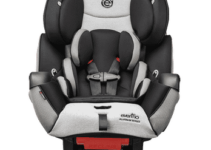
All-In-One car Seats
This seat combines all modes of child restraint systems into one model, which can be cost effective, taking a child from birth to booster.
Some all-in-one car seats may not fit all children and vehicles in the same way, so it is important to carefully review your seat before purchasing it in order to be aware of the pros and cons of the way it fits in different ages and stages.
All-in-one car seats are appropriate for children who are:
- weighing between 5 and 50 pounds when rear-facing (varies between manufacturers)
- older than 2 years old and 20 to 65 pounds when forward-facing
- 30 to 120 pounds when in booster mode (preferably at least 40 pounds and older than age 4)
Further Reading:
Chapter Four: The Orientation of Car Seats
When we talk about the “orientation” of car seats, we are usually refering to the direction of the car seat: rear-facing vs. forward-facing.
This is a very important transition that should not be rushed. We know that rear-facing is up to five time safer for children, reducing the chances of severe injury and death.

The visual guide below provides insight into the approximate age of your child in relation to the type of seat they should be using.

Source: SaferCar.gov
Why Rear-Facing Is So Much Safer:
A child’s vertebrae are one of the most important factors when choosing a rear- vs a forward-facing seat (in addition to their head and neck).
A toddler, for instance, showcases vertebrae that are connected via cartilage — not bone. That’s why children’s spines are much more vulnerable to injury than adults.
Over time, these connections close.
Take a look at these photos of vertebrae of children ages 1 and 6:

Vertebrae age 1 and 6. Photo Credit: White, T. Human Osteology, 2000
You can see how the 1-year old child still has open vertebrae (with cartilage spaces instead of bones), while the 6 year old has almost closed ones.
These open vertebrae can stretch up to 2 inches. But we don’t want that to happen!
It only takes 1/4” stretch to rupture the spinal column. This can result in death or paralysis during a car crash.
This is why it is imperative not to transition a child to the next stage of car seats before they have fully outgrown their current stage, especially when it comes to the transition between rear-facing and forward facing.
We want to provide the most protection possible to the head, neck, and spine.
Regardless of your parenting style, facts are facts. This key study shows that based on statistics from 15 years’ worth of crashes, the odds of severe injury for forward-facing infants under the age of one is 1.79 times higher than those in rear-facing seats; and for children between 12 and 23 months old, the odds were 5.32 times higher.
For a more in-depth explanation on the benefits of rear facing, please watch this video:
https://www.youtube.com/watch?v=h0Cx-39XRCY
There are several common rear-facing car seat myths in relation to this orientation that can unnecessarily worry some parents. Fortunately, many of these concerns can be resolved by gathering more information about the issue.
Rear-Facing Car Seat Myths:
- My child’s legs are too long — the truth is, children in rear-facing seats rarely sustain leg injuries. Even when a child sits with his/her legs crossed-legged, they are safe — it’s whatever is most comfortable for the child, as long as they are properly secured.
- My child is too big — it’s known that even children in the top 90th percentile for height and weight can still fit within this type of seat past two years of age.
- My child looks too uncomfortable — if you’re looking at how your child sits in their seat, thinking that they look uncomfortable, know that they’re much more flexible than an adult. Have you ever noticed that children can fall asleep in odd positions? For the most part, they couldn’t care less about their positioning — remember safety is always the top priority!
- My car is too small — there are specialized car seats to properly fit any vehicle; even 2-seater sports cars can allow a rear-facing seat in the back.
The obvious question now is:
If a rear-facing seat is so safe, why would you switch to a forward-facing seat?
The truth is, we would all be safer rear-facing!
But adult skeletons are much stronger than children’s which is why we don’t ride this way (it would be impossible to drive!).
The benefits of rear-facing are crucial to young children, but slowly begin to diminish the older they get. However, we should take advantage of the benefits of rear-facing as long as we can.
If your child has fully outgrown rear-facing seats, it is okay to turn them forward-facing.
Here are a few rear-facing tips:
- Keep your child in a rear-facing car seat until they reach the max height and weight as recommended by the manufacturer, regardless of their age. Meaning, if your child turns 2, but still fits, keep them in that seat and be mindful of any height and weight changes.
- If your child exceeds the height and weight requirements before they turn two, for instance, opt for a convertible, rear-facing car seat to meet their needs. This is a personal decision, but once again, the facts don’t lie — rear-facing seats can reduce the risk of injury when children are still developing.
- Only make the switch when it’s necessary based on height and weight restrictions. In Sweden, for instance, it’s perfectly acceptable that children up to the age of 4 are in rear-facing seats and the fact of the matter is, they have one of the lowest child traffic fatality rates in the world.
Still not sure when to switch to forward facing?
Take a look at this video that reviews some of the key considerations:
So, what about a booster seat?
Unlike the car seats discussed previously, a booster seat does not rely on a built-in harness, but rather positions the vehicle’s safety belt in order to restrain a child. Of course, these seats will be forward-facing and require an optimal fit. The lap belt should be laid across a child’s thighs — not their stomach. Read more here: current booster evaluations.
Further Reading:
Chapter Five: Choosing a Car Seat
Once you know what type of seat you need and what orientation your child requires, it is time for you to pick your ideal brand and model.
Please follow this step-by-step guide in order to find the best possible car seat for you.

Step 1: Know the TYPES of car seats
You need to make sure you’re familiar with the options available, so that you can make the right choice based on a range of factors. As we discussed in the previous chapter, there are:
- Rear-facing seats: including infant car seats, convertible seats, and all-in-one seats
- Forward-facing seats: including convertible seats, combination seats, and all-in-one seats
- Belt-Positioning Booster seats: including booster seats with a high back, backless booster seats, combination seats, and all-in-one seats
- Seat belts: A child must pass the Five-Step Test to use a seat belt alone
Step 2: Know age and size recommendations (from birth until the age of 13)
As discussed, there are specifications based on your child’s size and age:
Some additional points to remember include:
- ALWAYS follow the guidelines as specified within the car seat manufacturer’s instructions.
- Choose a seat that properly fits in your vehicle and that you can use properly EVERY TIME.
- Keep your child in their car seat for as long as possible. As long as they still fit in the seat based on their height and weight, safety can be enhanced by securing them in their seat.
- Although all children are unique in terms of their height and weight, it’s recommended that children stay in the back through 12 years of age.
Step 3: Compare all models based on safety ratings and features most applicable to your specific needs
All car seats on the market need to follow strict guidelines, however, some offer features that make them easier to use than others. Some have also included safety features that claim to go above and beyond federal standards.
It is important to note that ALL car seats that are properly installed are safe. No one can definitively determine how much safer one car seat is over another, because federal testing is simply a pass/fail.
Related article: The top 7 infant car seats
Related article: Our favorite travel systems
Related article: Our favorite convertible car seats
We will be adding more reviews as time goes on.
Step 4: Compare the ease of use of the various models you are interested in
NHTSA [National Highway Traffic Safety Administration] has evaluated the majority of car seats on the market to determine “ease of use” ratings.
They are categorized based on four key areas of focus:
- Evaluation of Instructions
- Vehicle Installation Features
- Evaluation of Labels
- Securing the Child
This table provides an inside look at the car seats that are currently available, so that you can make a more informed decision prior to your purchase: https://one.nhtsa.gov/nhtsa_eou/info.jsp?type=all
Car Seat Features — What Should You Look For?
Many car seats come with extra features. Some can offer additional safety to your car seat while others are merely for convenience and comfort.
Here are a few lesser-known features that provide added value to your car seat.
Safety Enhancing Features Include:
- Load Leg: This extends from the base of the infant car seat to the floor of the car. It decreases crash forces on the head and neck.
- Anti-Rebound Bar: This rests against the seat back when installed rear-facing. It controls the car-seat rebound in the even t of a crash.
- Linear Side-Impact Protection: A plastic wing that flips out of your seats’s side facing the car door and distributes side-impact crash forces.
- Side-Impact Protection: Beefed-up protection around a child’s head that can look like a set of wings extending out from the headrest or just padding under the fabric by the headrest
- Rigid LATCH: Stiff LATCH connectors that are build into the seat and connect directly to the car’s steel frame to reduce side-to-side motion in a crash
Convenience Features Include:
- No-rethread harness: Turn a dial or move a headrest up and down to easily adjust harness height as your child grows
- Premium LATCH connectors: Install with a click and disconnect with the push of one button
- Bubble-level indicators: Shows when your seat is installed at the proper angle
- Seatbelt lockoffs: Clamp your car’s seatbelt so seats installs tightly and stays firm
- Booster seats with LATCH: Connects to car’s LATCH system when using a booster seat with seat belt to keep empty seats from becoming a projectile during a crash
Remember, you must select a car seat based on your:
- Car
- Your child’s age
- Your child’s height, weight, and developmental level
This quick video provides you with further details, so that you can select the best car seat for the needs of your child:
Chapter Six: Picking a Location for Your Car Seat
There are several factors to consider when you are deciding where you want to place the car seat inside your car.
Each vehicle model has slightly different rules on what is allowed, which is why it is vital to look through your owner’s manual.

If you don’t know where your vehicle owner’s manual is, many of them can be found online or be sent at your request from the manufacturer.

Check this guide to determine where your car’s manual can be found.
2018 Honda Odyssey Vehicle Owner’s Manual
In your vehicle manual you’ll be able to find such things as the location of your head restraints, airbags, lower anchors and tethers (LATCH), and other pertinent information to child restraints and safety.
This information will help you choose the best location for your car seat. If you have several children, it may take some extra planning to decide who goes where. Here are some common questions about seating locations and how to use your manual to find the answers.
Q: Where should I put my child inside my vehicle?
A: In the back seat
Children should always be seated in the back seat if possible. Never, ever place a rear-facing car seat in front of an active airbag.

2011 Subaru Impreza Vehicle Owner’s Manual
Q: Is the center rear seat the safest place for my child?
A: Statistics do show that the rear center seat is 43% safer for babies and toddlers. However, that does not make the side seating positions UNsafe. It is most important that you are able to install the child restraint correctly every time. If you cannot get a good installation in the center position or your vehicle does not allow it to be installed there, then install it in one of the rear side positions.
In your vehicle manual, you will likely find reccommendations for seating positions and information about what features are available in each position.
Q: Are all rear seating positions suitable for car seats?
A: Some seating positions may not allow for car seat installation. Here are a few examples of some restrictions you may encounter:
- A seating position is too narrow (such as some center seats). There may not be enough room to install a seat correctly.
- A headrest that interferes with installation. Some can be adjusted or removed as per the manual instructions.
- A seat that lacks a tether anchor for a forward facing child
- Other situations where the vehicle manufacturer has determined it is not safe

Example of a car with a seating restriction: 2011 Subaru Impreza Vehicle Owner’s Manual
Q: Can I use LATCH in all seating positions?
A: No. LATCH (Lower Anchors and Tethers for CHildren) are only available in certain positions. Refer to your owner’s manual to see where these locations are. There are special rules for many center seats on whether or not you can use the lower anchors there.

Example of LATCH locations and restrictions: 2018 Honda Odyssey Vehicle Owner’s Manual
Lower anchors come in pairs. These pairs are most commonly placed in the outboard positions (side seating positions behind the driver and passenger). Federal guidelines dictate that lower anchor must be spaced 11 inches from its mate. If lower anchors aren’t clearly marked as a pair, then do not use them that way.

Example of a vehicle that does not allow use of lower anchors in the center seat: 2017 Honda Accord Vehicle Owner’s Manual
If your vehicle does allow for using LATCH in the center, and the distance between the lower anchors is more than 11 inches, you will need to check the car seat manual to see if they allow it to be installed there. BOTH the vehicle manufacturer AND the car seat manufacturer have to approve this “non-standard spacing” in order to use LATCH. Otherwise, you will need to install your car seat with the seatbelt instead.

Example of a car seat that does not allow non-standard LATCH spacing: Graco Extend2Fit Manual
Q: Do I have to put the car seat in a seat that has LATCH?
A: No. Most car seats can either be installed in an equally safe manner with a seatbelt OR lower achors (LATCH). Use the method which is easiest for you to install and is permitted by both the car seat and vehicle manufacturers. Never use both (unless specifically mandated by the car seat manufacturer). Always use the tether anchor for forward facing children regardless of whether you use the seatbelt or lower anchors for installation.
Q: How do I decide which child goes where?
A: Take all the factors into consideration and prioritize them.
- All seats need to be installed securely in a position where they fit properly and which they are permitted to be
- Forward Facing children need access to a tether anchor
- Place the most vulnerable child in the rear center seating position (if possible)

Left and Right: Example of labeling of lower anchors and tether anchors in the 2018 Ford Flex // Center: Example of acceptable and non-acceptable seating locations in the 2011 Subaru Impreza
Further Reading:
Chapter Seven: Installing Your Car Seat
Many parents wonder if they should install their seat using the LATCH system or the seatbelt, and if it matters which one they use.
The short answer is that they are equally safe when used correctly.
But you only choose one or the other—lower anchors and tether (LATCH) or the seatbelt and tether—never both.

Here’s an introduction to the difference between using a seatbelt versus the LATCH system for installing car seats:
Let’s learn a little bit more about the LATCH system.
LATCH
LATCH stands for: Lower Anchors and Tethers for CHildren.
The LATCH system was created as an alternative way to install car seats in vehicles. This system is composed of two lower anchors and one tether anchor in a vehicle seat for use with car seats. LATCH was intended to simplify the process of installing car seats so parents would find it easier to install their car seats correctly.

The federal government has established regulation for the use of LATCH.
All vehicle models 2003 and newer must provide two sets of lower anchors and three tether anchors. These anchors are typically made from metal bars or other similar hardware.
Most lower anchors and tether anchors should be labeled in your vehicle or shown in your vehicle manual. Child Restraint Systems (car seats) are required to be equipped with lower anchor and tether connectors (a special combination of straps and hooks).

There are weight limits for using the lower anchors in LATCH.
The weight of your child plus the weight of your car seat cannot exceed 65 pounds (or 69 pounds in newer forward facing car seats).
Newer car seats (manufactured after 2014) have a prominent label on the car seat stating what the weight limit for your child is. You can also find this information in your manual.
Once your child exceeds the weight limit for the lower anchors, your car seat MUST be installed with the vehicle seat belt (but you should still use the tether anchor when forward facing with your vehicle seat belt).

Graco Extend2Fit Label showing the weight limits for lower anchors
Seatbelt
If you don’t have LATCH available, your child is over the weight limit, or there is another reason you aren’t comfortable with using it, you can install your child restraint with the vehicle seatbelt.
Using the seatbelt is just as safe as using LATCH if you can get a tight installation.
Your seatbelt needs to have a locking mechanism in order to be able to use it to safely install a car seat.
Look for instructions in your vehicle manual about how to lock your seatbelt. If you don’t know if you are able to lock your seatbelt, contact a Child Passenger Safety Technician for free assistance.
Installation Checklist
Here are a few basic steps to keep in mind as you prepare to install your car seat. Steps will vary, so always read your car seat and vehicle manuals.
- Decide where to put your car seat and whether to use the vehicle seat belt or lower anchors (LATCH). Locate the associated hardware
- Place your car seat on the vehicle seat and check the recline angle
- Locate the correct belt path for either rear-facing or forward facing
- Route the seat belt OR lower anchor strap through the belt path, making sure it does not become twisted
- Buckle the seatbelt or connect the lower anchor attachments to the lower anchors
- If using a seatbelt, lock the seatbelt (usually by pulling the seatbelt all the way out until it clicks) or use your car seat’s lock off mechanism (if available)
- Press down on the seat while tightening the seat belt or lower anchor straps
- Test the tightness of the seat by pulling the seat side-to-side and front-to-back at the belt path (“The Inch Test”). If the seat moves less than one inch either direction, then it is tight enough. If not, repeat steps 7-8. If you cannot achieve a tight installation after multiple attempts, try moving the seat to a different location or switching your installation method (LATCH vs. Seatbelt, if permitted).
- If your car seat is forward facing, attach the top tether and tighten.
The Inch Test Demonstration:
You’ll find more detailed information about installing your specific type of car seat within these specialized guides below. Many of them include a very helpful video demonstration.
See full list of installation videos and guides here.
[table id=7 /]
Harnessing
Now you’re ready to put your child in the car seat. Rear facing seats and forward facing seats have a 5-point harness that needs to be buckled a certain way.

Here are a few important things to keep in mind when buckling your child in the car seat. Always remember to read your manual, as these are only general guidelines.
- Locate the appropriate harness slots. For a rear-facing seat, the harness should feed through the harness slot at or just below their shoulders. For a forward-facing seat, the harness should be in the slot at or just above their shoulders.
- Ensure that the crotch buckle is in the appropriate slot. Some crotch buckles have more than one slot so you can adjust it as your child grows. The crotch buckle should be close to your child without them sitting on top of it.
- Place your child in the seat and make sure they are all the way flat against the back of the seat.
- Put the harness straps over your child and buckle. Make sure the straps are not twisted.
- Buckle the chest clip.
- Remove slack from around the hips by gently pulling up on the harness straps.
- Tighten the harness using the adjustment strap.
- Do the “pinch test.” Focus on the part of the strap that is placed over your child’s collarbone. If you can pinch any harness webbing, it’s TOO LOOSE. When the webbing is snug enough, your finger should slide off when trying to pinch.
- Raise the chest clip to armpit level. It must be in this location in order to properly position the straps for a crash.
You can view the pinch test in-action here:

Rear Facing and Forward Facing Harnessing Checklists in the Graco Extend2Fit Manual
Further Reading:
- Car Seat Mistakes You May Be Making (11 Safety Errors)
- Video: Comparing a seat with a tether vs. without a tether
Booster Seats
Belt-positioning booster seats (and if you are using your combination/all-in-one seat in booster mode) have a different setup. They don’t need to be tightly secured on the vehicle seat the same way that a harnessed seat does. This is because the booster seat itself isn’t restraining your child during a crash; but rather the seatbelt is. The purpose of a booster seat is simply to allow the seatbelt to do its job correctly by positioning the seatbelt over the strongest part of your child’s body.
Following instructions for booster seats is just as important as installing a car seat.
Most belt-positioning booster seats work in a similar manner. Here are a few basic tips to installing your booster seat. As always, read your manual to determine the exact steps for your booster seat.
Booster Checklist:
- Determine where you would like to place the booster seat within your vehicle. Make sure that it has a lap-and-shoulder belt. NEVER use a booster seat with a lap belt only.
 Label from the Harmony Youth Booster
 - Place the booster on your vehicle seat. Make sure it fits properly in the space and lies flat. If you have a backless booster, make sure your vehicle has a headrest in the position you choose.
- Locate the seat belt guides on your booster seat. They are typically marked with a specific color or arrow to show you where the seat belt should go. Many seats have a ring near the shoulder where you pull the shoulder part of the seatbelt through. There are usually indicators of where the lap part of the belt should go. This is usually under the armrests (if your seat has them).

- Place your child in the booster seat. Make sure they are sitting all the way in the back of their seat with their back straight.
- If your booster has a shoulder belt guide, position the belt guide so that it is slightly above your child’s shoulder
- Route the seatbelt through the belt guides and buckle it.
- Check how the seatbelt fits your child. It should cross the shoulder and lie flat against the chest. The lap belt should be low on the hips/upper thighs, not on the stomach.
- Observe your child to see if they can continue to sit properly through the whole ride. They should not slouch or wiggle into awkward positions.
- If the seatbelt is not fitting properly, try adjusting the shoulder belt guide up or down. If that doesn’t help, try placing the booster in a different seating location. Seat belts tend to have slightly different angles in each seating position.

Proper belt fit in a high-back booster.

Proper belt fit in a backless booster.
Important Reminders:
- Installing your car seat correctly is the most important way to protect your child. Whether you spend a lot or a little bit of money on a car seat, if you do not install it correctly, your seat will not be able to do perform the job it was intended to do—protecting your child. This is important because car seat misuse varies from 74 to 90 percent. Yes, you read that right!
- Rear-facing car seats — never install in front of an active airbag. The seat should be reclined at a 45-degree angle. Make sure the carrier latches are secure each and every time, the harness straps aren’t twisted, and that your child is secure based on the manufacturer’s instructions.
- Forward-facing car seats — once again, install away from airbags, and adjust to an upright position. Always use the top tether.
- Booster seats — ensure that your vehicle has a lap and shoulder seat belt (never use the lap belt by itself, this is dangerous), which should lie across your child’s shoulder and low hips respectively. Make sure your child’s head is supported and never use seatbelt adjusters.
Read More:
- Insurance Institute for Highway Safety Booster Seat Evaluations
- How to Use a Booster Seat
- Harness or Booster: When to Make the Switch
Chapter Eight: Car Seat Laws
In order to further protect children, all states have implemented laws based on specific criteria.
These generally applies to three key stages, as discussed earlier:
- When infants are using rear-facing seats
- When toddlers are using forward-facing seats
- When older children are using booster seats

Knowing these laws can provide a starting framework to ensure that you’re doing everything right — so that a tragic accident can be prevented.
Most state laws are only a bare minimum and may not necessarily give you all the information of what is considered the “best practices” in car seat safety.
Laws are being updated all the time, so parents should try to stay up to date with current laws in your state of residence as well as any places you may be traveling.
If a parent is found to be breaking the law, it will not only act as ‘wake-up’ call, but will also present itself in the form of a fine — carrying from $10 to $500. In some cases, your driver’s license points mat also come into play.
So, what are some of these laws?

According to the Governors Highway Safety Association, here’s what you need to be made aware of:
- 48 states and the District of Columbia and Puerto Rico require booster seats or other appropriate devices for children who have outgrown their child safety seats, but are still too small to use an adult seat belt safely.
- The only states lacking booster seat laws are Florida and South Dakota.
- Lawmakers are responding to updated rear-facing recommendations by updating child restraint laws to require rear facing until age two.
- 6 states (California, New Jersey, Pennsylvania, Oklahoma, Oregon and South Carolina) require children younger than two be in a rear-facing child seat.
- Half a dozen additional states have proposed legislation to enact similar laws. Contact your representatives to voice your opinion on this important matter.
- 5 states (California, Florida, Louisiana, New Jersey and New York have seat belt requirements for school buses. Texas requires them on buses purchased after September 2010. Learn more about school bus safety here.
Each state then enforces variations of the law based on their specific legislations. Access all state laws here — and make sure that you and anyone whom drives your child from point A to point B follows both state and federal laws.
As stated in a 2013 review, uneven policies exist from state-to-state, suggesting a strong need for improved communication among researchers, advocates, legislators, and citizens. However, if you follow the best practices outlined in this guide, you will almost always be meeting or exceeding all state law’s requirements.
Here are some examples based on varying states:
U.S. Map showing Rear-facing laws and legislation in 2017
U.S. Map showing state fines for child restraint offenses
Further Reading:
- Safety Belt and Child Restraint Laws
- Child Restraint Laws by State
- Research Study: Child Passenger Safety Laws
Chapter Nine: What Else You Need to Know
This chapter contains important information that we couldn’t fit into the rest of the guide.
It covers:
- Child safety passenger technicians
- Recall information
- Airline travel
- How to clean your carseat
- Special needs transportation

Child Passenger Safety Technicians
There are safety programs offered across the nation, ensuring proper certification. The National CPS Certification has inspired over 40,000 technicians to become advocates within their community.
Don’t be like this mom:
find a tech in your area or become a tech to help others.
Recall Information
We have certainly covered all aspects of car seat safety, but there’s still an area that needs to be addressed — recall information. Like most things in life, a proactive approach is always best.

- In order to view recalls from May 2007 through to the current date, please view The National Highway Traffic Safety Administration’s Child Seat Recall Campaign Listing. Please note: earlier recalls will need to be searched.
- You may also file a complaint regarding an issue you have personally had with a car seat. Register your child seat + sign-up for email notifications when recalls occur.
Airline Travel
The Federal Aviation Administration (FAA) states on their website:
“Did you know that the safest place for your child on an airplane is in a government-approved child safety restraint system (CRS) or device, not on your lap? Your arms aren’t capable of holding your child securely, especially during unexpected turbulence.”
Find tips on flying with children, instructions for car seats on planes, and more on the FAA Website.
Here are 2 instructional videos that you will find useful:
Cleaning and Care of Car Seats
Cleaning a car seat seems pretty straightforward, but each manufacturer develops specific guidelines for the cleaning of their seats to ensure it stays in good working condition and that no parts become compromised. Your car seat manual will tell you everything you need to know about caring for your specific seat.
A few rules of thumb usually apply:
- No harsh soaps/chemicals/essential oils. These can break down fibers in your seat. If your seat cover can be machine washed, use a mild detergent. Ideally, use something with a neutral pH.
- Never machine wash harness straps. This will reduce the effectiveness of the harness in a crash.
- Never machine dry; air dry instead. Air drying in the sun can help reduce odors.

Example of Cleaning instructions in the Graco Extend2Fit Manual
Special Needs Transportation
Most conventional car seats are appropriate to use for special needs children as long as they possess the features that can address the needs of their condition. Specialized restraints are available when this is not the case. It may be helpful to seek the assistance of a Child Passenger Safety Technician who is trained in special needs to locate these specialized restraints.
It is even more vital that children with special needs not be rushed to the next “stage” of child restraints. Children with low muscle tone should remain rear facing as long as possible. Children with behavioral challenges may not be ready to ride in a booster seat until a few years older than the average child.
Find more information about special needs transportation on the Automotive Safety Program’s website.
Further Reading:
SUMMARY: Remember to ALWAYS do the following:
- Use the right seat — pay attention to all aspects as featured throughout this guide. You need to be aware of your child’s height, weight, and age — as this will determine their skeletal development.
- Check for any potential up-to-date recalls + read BOTH your vehicle and car seat manual.
- Make sure the seat is secure — after you install your child’s car seat, the seat itself should NOT move more than 1 inch front-to-back — or side-to-side. Be patient and make sure the seat is secure.
- Make sure the harness is tight — once the seat is secure, you need to make your child is secure as well. When positioned in their harness, you should not be able to grab any loose fabric on the straps by their shoulders. Also, be aware of the harness height — the chest clip should always be at armpit level.
Note: All product images courtesy of Amazon and all other images courtesy of NHTSA unless stated otherwise